
Optimizing Your Organization’s Vendor Management in FinancialForce

Are you optimizing your ability to manage your vendors with FinancialForce PSA? Do you want to cut down on the time it takes to approve vendor invoices? FinancialForce makes vendor invoicing and payment reconciliation easier by giving the vendor access to manage their own invoices in your FinancialForce PSA. By using a combination of Vendor Budgets and Vendor Invoice objects, vendors have control over invoicing completed, while your organization has control over approval of vendor invoices directly in PSA.
Before using Vendor Invoices, you will need to the following in place:
- Accounts and contacts in Salesforce for your vendors
- A Salesforce Community, if you prefer to have your vendors login via a partner community
- Users are setup with the proper profiles, roles, and sharing settings to access the system via the community
Vendor invoicing is a two-step process comprised of a Vendor Budget for funding approval by your organization, and a Vendor Invoice created and submitted by the vendor for payment against the approved budget.
To begin, create a vendor budget for each project that will have a vendor invoice. Budgets can be found on the project detail page under the Budgets related list on the page layout.

(Click image to enlarge)
- Fill out the Budget Fields keeping in mind the following critical fields:
- Type: Vendor Purchase Order
- Account: Account name of the vendor
- Amount: Total Amount Vendor will be charging for project
- Expense Amount: Total Amount Approved for Vendor Expenses
- Save and Approve the Budget (NOTE: An approval process may be setup to route budgets for approval)
- Fill out the Vendor Invoice Fields, keeping in mind the following critical fields:
- Account: The vendor account to which the invoice relates.
- Invoice Number: Unique ID of the vendor invoice
- Date: Invoice Date
- Save the Vendor Invoice
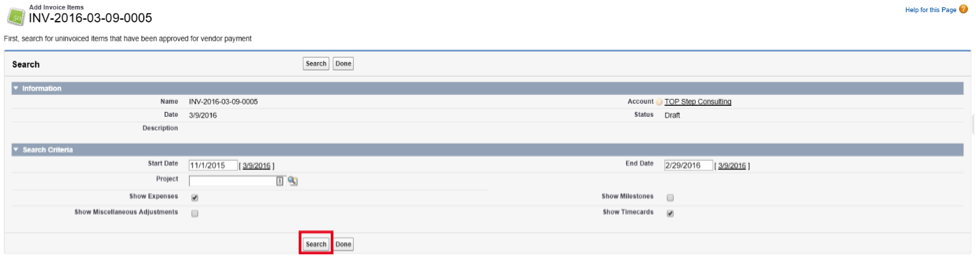
- From the New Invoice Item form, search for an un-invoiced items to add an invoice by entering your Search Criteria
- Start Date
- End Date
- Project (if the invoice should relate to a single project)
- Show Expenses
- Show Miscellaneous Adjustments
- Show Milestones
- Show Timecards
- Click Search to display un-invoiced related items.
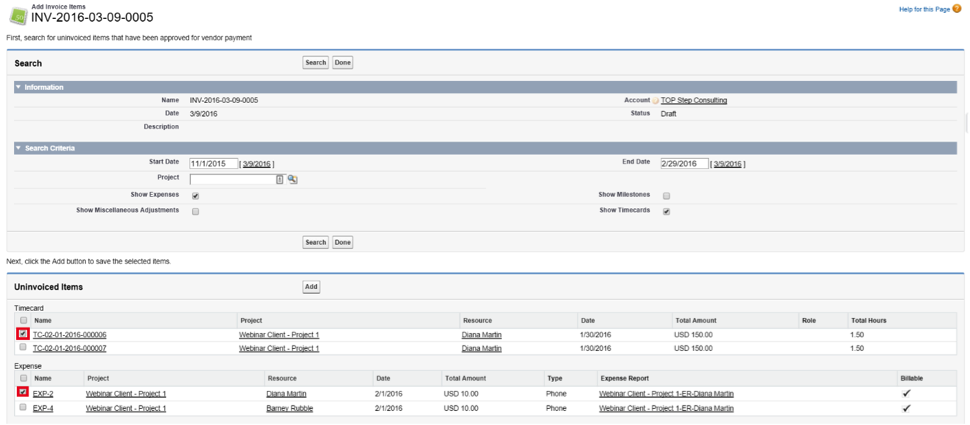
- Select all the un-invoiced items that you would like to add to the invoice. If you do not see the items you are looking for listed, make sure that the Expense, Miscellaneous Adjustment, Timecard, or Milestone has the Approved for Vendor invoicing checkbox checked. One might need to adjust their approval process to include checking the Approved for Vendor invoicing checkbox.
- Click Add to add the selected Invoice Detail Items, then click Done to complete the Invoice.
- Click Save to complete the submit action.
Once the Vendor Budget is in place, vendors may now create Vendor Invoices against the approved budget for work delivered, as entered into FinancialForce. To create a Vendor Invoice, access the Vendor Invoice Tab and select the New button.

(Click image to enlarge)
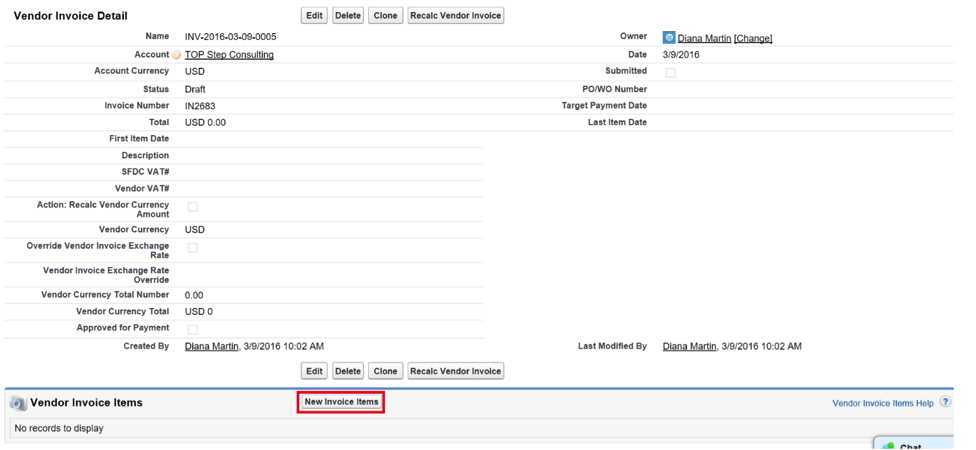
The Vendor Invoice at this point is a shell or header only. Invoice items need to be added by searching for vendor related transactions that have not already appeared on an invoice. To add Invoice Items, navigate to the Vendor Invoice items related list on the Vendor Invoice page layout and select ‘New Invoice Items’.
(Click image to enlarge)
(Click image to enlarge)
(Click image to enlarge)
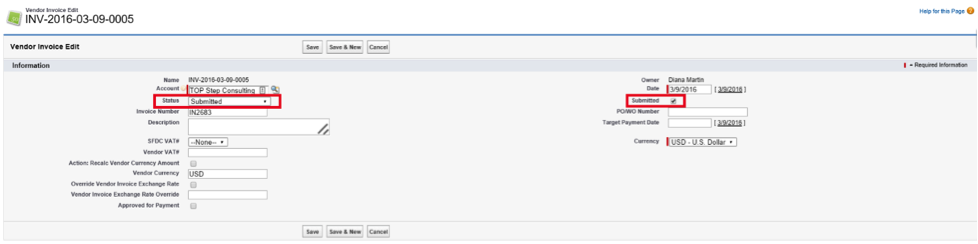
The completed Vendor Invoice can then be submitted by the Vendor for approval. To submit a vendor invoiced, select Edit on the Vendor Invoice page and change the Status to ‘Submitted’ and check the Submitted checkbox.
(Click image to enlarge)
The Vendor Invoice is now submitted for your organization’s approval. Your organization can use list views to lookup submitted vendor invoices, or setup an approval process to be triggered once the Vendor Invoice status is set to Submitted. Your organization would review and change the Status to Approved for Payment and check the Approved for Payment checkbox.
Your organization can have confidence that the vendor invoice only includes transactions not already invoiced that are related to the vendor and are accurate per the defined budgets. Vendors can streamline their invoicing process to your organization by using your organization’s FinancialForce PSA.
For more tips on helpful features in FinancialForce, check out TOP Step Consulting’s recorded webinars, including “Top 5 FinancialForce Features and Why You Should be Using Them.”